Showing posts with label My Designs. Show all posts

Thursday, May 21

Paperbabe Stamps ~ Kawaii Face stamps & Adorimal Digi Collection

We're introducing the Kawaii face stamp set and Adorimal Digi stamps on the Paperbabe Stamps blog today
 
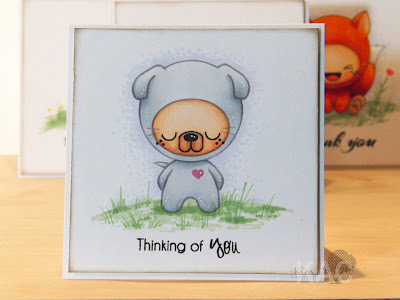
Here's a bundle of samples I created using the faint outline digis... sooo cute
Using sentiment from Just Because
Using sentiment from DesignA Knit
Using sentiment from Just Because
Using sentiment from Mayleedee Little Red
 
Well I ended up creating a little bundle of mini 4" cards, with cute envelopes with stamped faces on, I think these faces might be popping up on many things now... (is anything safe?) The tag uses the digi head, I simply cut the card at a funky angle and stamped love and hearts, I think they've showed up on every card too lol!
 
Here's the colours I've used for this whole set, oooh and a new sharpie white marker for those sparkle dots.
  
 I would love to enter these into a few crafty challenges:
 
Thank you so much for stopping by and sharing in our release today, I hope you're just as excited about this release a my children, it's currently their all time favourite set, their creativity with these stamps have been totally brilliant!
 
Enjoy a wonderfully creative day!!!
HuGs Kim x

Wednesday, July 24

Knitted Thanks

Here's a pretty quick card to put together...

 I used the DesignA Knit to create the background panel
The colours are from the summer card camp this week and they are not my usual palette... but I persevered and was pleased with the result.

I scored the banner at the opposite angle then I had wanted but guessing it still reads the same! These wooden buttons I've had in my stash for years.


Have a wonderfully creative Day
BiG HuGs Kim x

Friday, December 3

January Craft Stamper, Tutorial and Blog Candy!!!

THE January issue of the Craft Stamper Magazine is out on sale today, see the site for their wonderful free vintage download!


This is a very special issue for me... if you look closely you will see that I designed the cover stamp. WOoo HOoo!!! Thank you Katy for this opportunity, I also have a colouring article using Kraftin Kimmie Stamps.


So I thought I would put together a tutorial on the little cupcakes, with cupcake topper featured in the magazine.. you see, I can't resist a little tea party so I went to town with invites, tea bag treats and thank you card which you'll find on page 6 of the magazine tee hee!

I started with two sizes of ribbon reel, can't beat a bit of recycling...
Then cut the circle you just drew, this will give the tapper on the case.
Taking some trim about twice the size of the reel start to sew the top edge with running stitch using elastic thread. 
Tie off with a knot so you have a gathered frill for around the largest reel. 
Take a pretty paper doily cut a circle from the centre and cut to form a cone. 
Then tape I've used Tim's tissue tape it won't be seen under the outer case. 
Then with a little more tape LOL secure the doily on the smallest reel, this is the base.
Measure the height of the two reels and cut a strip of patterned paper. Score every half cm scoring every other on the back to create mountain and valley folds. 
Secure with strong tape.
Adhere scored outer case to the doily case, I've used my ancient hot glue gun. 
Time for the cupcake top... cut a polystyrene ball in half 
Cut some cream felt.
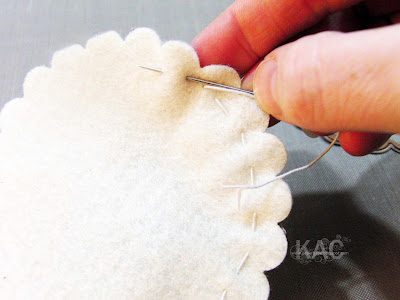
Sew with a running stitch again using elastic thread to create a cover for the poly ball.
Next adhere frilly trim to the felt covered poly ball. 
For the icing topping I've used some crepe paper... 
Twist it into a swirl, twisting it around a pencil to start helps. 
You will want to use a cocktail stick at this point to show the position the topper with be. Adhere your crepe topping onto felt cake top. 
The icing is made from acrylic paint, I've mixed in a little pink from my pink dabber you might add a little water depending on the consistency you would like.
Then simply pour the paint icing over the top. 
While the paint is still wet sprinkle on some glass glitter or sparkle of your choice and leave the cake to dry.
Then, it's a simple case of creating a topper using teacup stamp and adding a little ribbon, flower and bead!

I hope you enjoyed my tutorial I realise there are lots of awesome cupcake tutorials out there! AND... Before you head off I have a little Blog Candy (about time hey?) to say thank you to you, for all the wonderful support and enjoyment this craft gives!!!

So first off is a copy of magazine with a pad of pink paislee papers and a few extras so you can make your own cupcake! and...
Two amazing JustRite stamps sets!
 So if you would love to leave a comment for a chance to win it's open to everyone! A winner will be randomly picked on the 17th December!!! Good Luck and thank you for stopping by.

Have a wonderfully Creative Day
BiG HuGs Kim :)

Monday, March 29

Ready for The next Preview?


Good morning, today over at Club Anya & Friends you will find more April preview's...

Wow what a weekend, not only up to the Royal Academy in London on Friday (more to follow) but out all day saturday at the NEC we had a fabulous fantastic time us blogging buddies. I did buy a few yummy crafty supplies and I would have taken a picture but I was already into the packaging and playing to make this next sneek peek....


It's the second preview of The Greeting Farm's new April releases, Marie has designed this adorable cutie Deedee and this little beauty reminded me just a bit of my sweet angel, curly hair (check), angelic face (check), cute boots (check), so as it's Maoleidigh's birthday on Friday (Phew) and she will be two and she's a proper girly girl I have made her this little dinky handbag! It really isn't a great design, you see I thought I would be clever and add an extra pleat or two for her  rummagey little hands but then the flap of the bag just doesn't close properly... it definitely needs more work on it.


Supplies: Patterned Paper: Cosmo Cricket; girl friday;
Stamps: TGF: ws Deedee -(release 1st April);
Ink: memento; Copic: markers*;
Dies: Sizzix: flower layers; foliage; Spellbinders: Nestabilities: labels; butterflies; Martha Stewart: corner and border punch;
Other: coloured felt; BG: button and brads; Adhesive stones; 3D foam;

*Skin: E000, 21,13 & R20, eye's: B41, Hair: E50, 53, 35 Outfit: RV10, 23, 34, R20, G12, YG93, E50, N3 I use my colourless Blender throughout.

Thanks so much for stopping by I hope you are totally enjoying these new releases and do check out the rest of the teams stunning creation's...


So talking of Maoleidigh... if you have a spare moment you could pop over to my arty blog to see the finished piece that we took up to London, tee hee... BiG HuGs Kim :)

Saturday, January 17

Basic Grey - My Sweet Valentine's


I really wanted to get all this uploaded earlier but I've had such a busy weekend! My baby turned five yesterday... wow we've been entertaining and partying everyday and still have a little lunch party to go to tomorrow! So much fun....


Challenge 18 - Digi Print Challenge

We have a special challenge for you this week, we would like to see you use one (or all if you want to) of my illustrations (Only people taking part in this challenge are allowed to use these images (for now anyway) and of course when the challenge is over you can continue to use them if you wish but please remember that these images are copyright to me and should only be used according to my terms of use), oh and course not forgetting to use at least one item from BasicGrey somewhere on your creation :)


So here's my creation with my illustrations hope I did myself justice... I drew this boy as a shy boy giving his valentine's a gift without being soppy or in any way romantic, notice the blush on this shy boy's face? So typical!

I printed the image onto a heavy weight cartridge but it came out a little faint, I used my copic markers to colour the rest and cut with my labels die, with the die in place then inked the edges with distress inks! The card base I have stamped with script stamp and distress inks!

The word Valentine's I printed directly onto basic grey patterned paper. I then cut out and laid it to the back of the darker paper to draw around. I cut just a little away from the pencil line so that I could achieve a shadow effect! The cut out word has been raised on 3D foam and I've highlighted with white gel pen and added shadow with grey marker to distinguish between the letters!!


Materials:
Paper: Basic Grey - Bittersweet, heavy weight cartridge,
Stamps/image: My drawings - Shy Boy, Valentine's, Script
Die's: Nestabilities - Labels 1,squares, sizzix - neet knacks,
Ink: Distress inks, sakura - pastel, copic sketch markers,
Other: Doodlebug - rubons, edge distresser, Adhesive gems and Bling, 3D foam,

I hope you like and get a chance to have a go. It's such a wonderful feeling to see such talented designers using my sketches, WOW our design team has done some amazing creations hope you have a look! Thanks you!

So... onto some other big news, As you know I am a member of the wonderfully talented design team over on Basic Grey Challenges blog and I took the chance and entered one of my card's into the Basic Grey gallery and I received an email to tell me it was accepted so off you go and have a look at my card in the Official Basic Grey Gallery! Woo Hoo! I would like to thank Martine of course for her wonderful sketch, you've helped make it all possible! Thank you sweetie x!


If you made it down to here, thank you, and I'm really looking forward to seeing all your wonderful creations! Hope you have a great weekend, Happy HuGs Kim x

Monday, December 1

BG Aperture - Gift With Bow

This card is for the Basic Grey Challenge using my image Gift with Bow


The aperture I created using label 1 dies, it's very hard to see... the inner frame is made with glitter card, you may see it better in the close up! I also used the same glitter card for the right hand trim, layered with adhesive lace and embellished with red gems and used glossy accents to create cute little flowers.

So I printed my image twice one on patterned paper then the next on the plain red colour. I then cut each piece out, I embellished the bow using my copics, white ink pad and white gel pen. I have raised the bow on thin ink pads to give dimension! The patterned paper I inked the edges! Then the gift I adhered over the aperture.


click images for a close look


Materials:
Paper: BG - wassail, MM cardstock - redrock, white glitter card,
Die's: Nestabilities - long rectangles, Labels 1,
Stamps: PPS -
What Every Gal Needs, PTI - silent night,
Ink: Hero Arts Shadow, Colourbox - Frost white, Copics, gel pen.
Other: Adhesive lace, pretty gems, glossy accents, 3d foam,


Myself and Dillon are recovering quite well, thank you for your kind thoughts and wishes, HuGs to you all, have great Monday! Kim x

Saturday, October 18

What a Rush...

I have had such an amazing time lately, although can't really say much about it at the moment, but am dying to tell about some wonderful news I received this morning ..... all will be revealed in a couple of weeks....


But in the mean time I would like to take your attention to a new area of my crafting....


The wonderful Amy over at Simply Sistas and Card Scents is opening a NEW website called pink papery studios and she has asked ME, yes Me to design some rubber stamps! I am still a bit stunned, but have managed to draw and I have sent a few designs over already! I am so excited totally like a little girl!!! I'm not sure on the exact launch date but will keep you posted and tease with a few sneak peeks!


My cheeks are killing me with all this grinning, way too happy!!! Ok... So I'm super excited... Wooooo Hooooo... You'll have to let me know your thoughts... I WILL keep you all posted I hope you will come and check it all out! HuGs Kim x

All Craft Sites

Since 21.08 You're Number...

Top 40 Arts and Crafts Websites