Friday, December 31

Happy New Year and Blog Winner!!!

Happy New Year Everyone!

It's been an amazing year for me filled with so much creative growth and lots of adventure. I've enjoyed sharing projects, being regularly published in Craft Stamper magazine and in Embellish magazine, I've shared a few tutorials with you and today I will have to pick the winner from my Blog candy, drum roll please....

Random Integer Generator

Here are your random numbers:
9
Timestamp: 2010-12-31 21:54:51 UTC

Which means looking through my list of commenter's it's the lucky Virginia.... Congratulations sweetie if you would love to email me your address I will post the winning parcel off to you!!!


Wishing you all an amazing New year I'm so excited about 2011 I'm looking forward to growing even more and thank you to all of you for your continued support and fantastic encouragement!!!! 

Over on the Quixotic Inspirations Blog Elaine has posted a 2010 in Review post showing the favourites from the Quixotic Paperie Design Team in the past year. Make sure you check it out – there’s some inspiring stuff in there!

Have the best new year Big HuGs Kim :)

Monday, December 20

Simon Says Stamp and Show ~ Something from Yesteryear!

Oooh it's Monday...  not long now, five more sleeps till Christmas Morn, I am really not organised at all! So straight onto this week's theme at Simon Says Stamp and Show which is....


Something from Yesteryear

I decided to make a vintage looking ornament, to capture the feeling of yesteryear. First I created an oval tile using images from the mini holiday stamp set, masked, coloured with copics, edges blended then completely covered with crackle accents. Then simply added gold Adirondack Acrylic Paint Dabber for the edges. It was then adhered to a frame shape made from Tim's vintage shabby papers, with inked edges and adhesive stones, the very edge has a generous amount of stickles too. I've added a crepe paper frill to the back of the ornament have been dying to try this!


The 'merry christmas' is also from the mini holiday stamp set, inked and covered with clear embossing powder! My glittery poinsettia shrink plastic flower was created using Tattered florals die, coloured with distress inks and lots of gold stickles glitter for the centre. Finished off with a bow made from Webster's pages holiday trim attached using a fabulous charm clip and jump ring. The Idea-ology facet covers a stamped image and I've attached to the ribbon with a trinket pin.


Our wonderful sponsor ... Simon Says Stamp has donated an amazing $50 gift voucher and this challenge will run for two weeks ... so do join in if you can!

Hope it inspires and why not pop round the rest of the team to see their projects of yesteryear!!!

THE director ~ Linda Elbourne 
Kim Costello <~ You're already here ~ Linda Coughlin 

Thanks for stopping by have a wonderfully creative festive week!
BiG HuGs Kim :)

Monday, December 13

A Lord Tim of Holtz Technique...

Where have I been? it's MONDAY already!!! We have had a household of cold and flu and other winter nasties... YUK! and I'm slowly on the mend, have missed this week of fabulous challenges and only just getting the chance to catch up... ready for the new challenge at...


Your Lord Tim of Holtz Technique!!!

I used quite a few of Tim's techniques on my card, mainly inspired from his tag #3 of the 12 Tags of Christmas, I used the tissue tape on grungepaper technique but instead of alcohol ink I coloured the tissue tape with copic markers, it works beautifully, has a rich colour and the copic ink remains translucent. I then smudged a generous amount of distress stickles rock candy all over.


 But what I really, really wanted to try is the extreme masking technique... so, die cut tim's branch tree from mask sheet then turned the tree on it's side to become more of a branch. With blending tool, I inked tree with distress inks and stamped script in archival black. The bird is nestled in a little christmas green flower soft.


I used Snow Cap Adirondack Acrylic Paint Dabber for the snow flurries. The December label is from the mini holiday stamp set, inked and distressed! The glittery felt flower was created using Tattered florals die, stickles glitter for the edges and a pearl centre.


Hope it inspires and why not pop round the rest of the team to see their favourite techniques!!!

THE director ~ Linda Elbourne 
Kim Costello <~ You're already here ~ Linda Coughlin 

Thanks for stopping by have a wonderfully creative day
BiG HuGs Kim :)

Friday, December 3

January Craft Stamper, Tutorial and Blog Candy!!!

THE January issue of the Craft Stamper Magazine is out on sale today, see the site for their wonderful free vintage download!


This is a very special issue for me... if you look closely you will see that I designed the cover stamp. WOoo HOoo!!! Thank you Katy for this opportunity, I also have a colouring article using Kraftin Kimmie Stamps.


So I thought I would put together a tutorial on the little cupcakes, with cupcake topper featured in the magazine.. you see, I can't resist a little tea party so I went to town with invites, tea bag treats and thank you card which you'll find on page 6 of the magazine tee hee!

I started with two sizes of ribbon reel, can't beat a bit of recycling...
Then cut the circle you just drew, this will give the tapper on the case.
Taking some trim about twice the size of the reel start to sew the top edge with running stitch using elastic thread. 
Tie off with a knot so you have a gathered frill for around the largest reel. 
Take a pretty paper doily cut a circle from the centre and cut to form a cone. 
Then tape I've used Tim's tissue tape it won't be seen under the outer case. 
Then with a little more tape LOL secure the doily on the smallest reel, this is the base.
Measure the height of the two reels and cut a strip of patterned paper. Score every half cm scoring every other on the back to create mountain and valley folds. 
Secure with strong tape.
Adhere scored outer case to the doily case, I've used my ancient hot glue gun. 
Time for the cupcake top... cut a polystyrene ball in half 
Cut some cream felt.
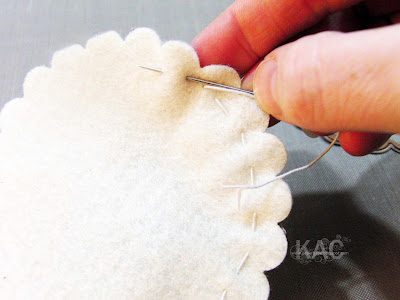
Sew with a running stitch again using elastic thread to create a cover for the poly ball.
Next adhere frilly trim to the felt covered poly ball. 
For the icing topping I've used some crepe paper... 
Twist it into a swirl, twisting it around a pencil to start helps. 
You will want to use a cocktail stick at this point to show the position the topper with be. Adhere your crepe topping onto felt cake top. 
The icing is made from acrylic paint, I've mixed in a little pink from my pink dabber you might add a little water depending on the consistency you would like.
Then simply pour the paint icing over the top. 
While the paint is still wet sprinkle on some glass glitter or sparkle of your choice and leave the cake to dry.
Then, it's a simple case of creating a topper using teacup stamp and adding a little ribbon, flower and bead!

I hope you enjoyed my tutorial I realise there are lots of awesome cupcake tutorials out there! AND... Before you head off I have a little Blog Candy (about time hey?) to say thank you to you, for all the wonderful support and enjoyment this craft gives!!!

So first off is a copy of magazine with a pad of pink paislee papers and a few extras so you can make your own cupcake! and...
Two amazing JustRite stamps sets!
 So if you would love to leave a comment for a chance to win it's open to everyone! A winner will be randomly picked on the 17th December!!! Good Luck and thank you for stopping by.

Have a wonderfully Creative Day
BiG HuGs Kim :)

Wednesday, December 1

HOPPIN' into the HOLIDAYS Blog Hop


I just HAD to take part in the TGF Blog ALL-CUSTOMER and DT blog hop, 
All the blog's taking part are on the master list!!!
"Let it Snow" (use snow in creative ways on your card)
"Santa, Baby" (cute Santa-inspired cards)
and "Holiday Treats" (incorporate some kind of treat/goodie theme into your cards!


I decided to make a christmas gift treat,
it all started with Marie's amazing note idea here instead of a card I have made a

2011 Miss Anya calendar!


I was feeling very stampy and created month pages by using the masking technique. I first created a mask for the printed month and then stamped Miss Anya and created another mask of her cutting a border so she had a halo of white.


I then went in with my background stamps and over blended with distress inks!
I have bound the pages together using my cinch!


Supplies: Patterned Paper: Pink Paislee - Sweetness
The Greeting Farm - Christmas - Keep Cozy;
Ink: Momento: black; Ranger: distress inks: Copic; white paint dabber;
Dies: sizzix alphabet; MS: border punch;
Other: post it note; Artisan Elements - Ornaments; WRMK: the Cinch and O-wires; corners rounder; 3D foam;

I hope you have fun on the hop! have a wonderfully creative Day!!!
BiG HuGs Kim :)

Monday, November 29

Quixotic Quickie... LOL!

Me again just wanted to stop by to share the latest news from Quixotic Paperie...

How Exciting? Today is Cyber Monday and there's special offers for you, available today and tomorrow so pop over and see!

BiG HuGs Kim :)

Simon Says Stamp and Show...

MONDAY already!!! wow the weeks are just zooming by...
I hope you had a wonderful weekend and are ready for a new challenge...
Simon Says Stamp and Show


Your Tags!!!

For me tags are the best way to really experiment and try out new techniques on a smaller scale...
So, I've created a layered tag probably because I didn't want to cover the 'perfect' image!


Seriously fired brick distress ink with copper perfect pearl is STUNNING!!!. It is really effective for the perfect distress technique which I've used on the large tag and had to apply to the wings on the grungepaper butterfly too. Also wanted to direct you to the button in the centre punched rosette.. It was originally blue I love this accoutrement of Tim's but never seem to create with that tone of blue. So... I got out my versamark pen and applied directly to the button and dabbed on the perfect pearl powder to these areas, then heat set.


The sentiment has been stamped on sticky back canvas, adhered to thin grey board and cut using styled labels die. I then inked with distress inks, stamped with Wendy Vecchi script background and finished off with a spritz of distress ink & copper perfect pearls.


An extra styled labels tag was cut from the clear acrylic packaging (you know the fabby stuff your die's come in) as I wanted the butterfly to appear like it's floating. Die cut the butterfly body from adhesive foam too so it would look better at the back!


The ball chain was added to give you the ability to move and read the sentiment. The 7gypsy's seam binding has been heavily creased, spritzed with glimmer mist and tied to the top.

Stamps used are Wendy Vecchi and Tim holtz.

Hope it inspires and why not pop round the rest of the team to see their fabulous tags!!!

THE director ~ Linda Elbourne 
Kim Costello <~ You're already here ~ Linda Coughlin 

Thanks for stopping by have a wonderfully creative day
BiG HuGs Kim :)
Saturday, November 27

BasicGrey Challenges #34 ~ A recipe!

Morning, Saturday already? It's time for my BasicGrey team make not as late this week ha ha ha...
The challenge this fortnight is

For this fortnights Challenge we would like you to use the following Recipe :)
4 Different Types of Embellishments
3 Different Patterned Papers
1-2 Images and/or 1-2 Sentiments


Supplies: Patterned Paper: BasicGrey: Curio;
Stamps: Elisabeth Bell for SCACD: 1st Leaf of Fall;
Ink: Momento: black; Ranger: distress inks: black; antique linen; Copic(as shown);
Dies: Marianne D Creatables: Frames/Swirls;
Other: BG: button; brad; Hero Arts: flowers; Adhesive pearls; 3D foam;
If you get the chance why not stop by the rest of the teams fabulous creations :)
 Sandra

I have followed Mercy's wonderful Tuesday Sketch #101 for the design of my card...

Thanks so much for stopping by hope you have a creative day
But before you head off...

There's a little something available at Quixotic Paperie

So click here to be taken to this wonderful offer!!!

BiG HuGs Kim :)

Monday, November 22

Simon Says Stamp & Show... Your Distress Inks!

It's MONDAY!!! I hope you had a wonderful weekend...
and are ready for a new challenge over

Show your Distress Inks!!!

Well... I most definitely use distress inks in every project!!! It is the base colour under the crackle effect on my little dimensional bird cage box. Yes a box,


originally thought I would make a frame by cutting layers of the bird cage from grey board then decided a lid would work fabulously for the other embellishments!


It is with a touch of Vintage Photo distress ink that enhance the edges of the die cut bird, cut using the gorgeous new curio BasicGrey papers, yum!


My handmade flowers were cut with the Tim Holtz Tattered Florals die again with curio papers, then sprayed with some distress ink glimmer mist.


Now, the handmade gem in the centre of the flower was created using my melting pot and UTEE powders. I wanted to try some Leandra beads, which were sooo much fun and then it extended from there and I made some heart and pebble shapes...


 The branch is cut from Tim Holtz Branch die and the cage is secured at the top with a idea-ology swivel claspHad to add some of Tim Holtz baubles secured with jump rings.


Hope it inspires and why not pop round the rest of the team to see how they include distress inks!!!

THE director ~ Linda Elbourne 
Kim Costello <~ You're already here ~ Linda Coughlin 

Thanks for stopping by have a wonderfully creative day
BiG HuGs Kim :)
All Craft Sites

Since 21.08 You're Number...

Top 40 Arts and Crafts Websites