This is a very special issue for me... if you look closely you will see that I designed the cover stamp. WOoo HOoo!!! Thank you
Katy for this opportunity, I also have a colouring article using Kraftin Kimmie Stamps.
So I thought I would put together a tutorial on the little cupcakes, with cupcake topper featured in the magazine.. you see, I can't resist a little tea party so I went to town with invites, tea bag treats and thank you card which you'll find on page 6 of the magazine tee hee!
I started with two sizes of ribbon reel, can't beat a bit of recycling...
Then cut the circle you just drew, this will give the tapper on the case.
Taking some trim about twice the size of the reel start to sew the top edge with running stitch using elastic thread.
Tie off with a knot so you have a gathered frill for around the largest reel.
Take a pretty paper doily cut a circle from the centre and cut to form a cone.
Then tape I've used Tim's tissue tape it won't be seen under the outer case.
Then with a little more tape LOL secure the doily on the smallest reel, this is the base.
Measure the height of the two reels and cut a strip of patterned paper. Score every half cm scoring every other on the back to create mountain and valley folds.
Secure with strong tape.
Adhere scored outer case to the doily case, I've used my ancient hot glue gun.
Time for the cupcake top... cut a polystyrene ball in half
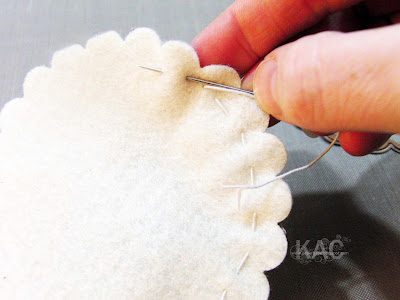
Cut some cream felt.
Sew with a running stitch again using elastic thread to create a cover for the poly ball.
Next adhere frilly trim to the felt covered poly ball.
For the icing topping I've used some crepe paper...
Twist it into a swirl, twisting it around a pencil to start helps.
You will want to use a cocktail stick at this point to show the position the topper with be. Adhere your crepe topping onto felt cake top.
The icing is made from acrylic paint, I've mixed in a little pink from my pink dabber you might add a little water depending on the consistency you would like.
Then simply pour the paint icing over the top.
While the paint is still wet sprinkle on some glass glitter or sparkle of your choice and leave the cake to dry.
Then, it's a simple case of creating a topper using teacup stamp and adding a little ribbon, flower and bead!
I hope you enjoyed my tutorial I realise there are lots of awesome cupcake tutorials out there! AND... Before you head off I have a little Blog Candy (about time hey?) to say thank you to you, for all the wonderful support and enjoyment this craft gives!!!
So first off is a copy of magazine with a pad of pink paislee papers and a few extras so you can make your own cupcake! and...
Two amazing JustRite stamps sets!
So if you would love to leave a comment for a chance to win it's open to everyone! A winner will be randomly picked on the 17th December!!! Good Luck and thank you for stopping by.
Have a wonderfully Creative Day
BiG HuGs Kim :)


