Friday, November 15

Introducing ~ Paperbabe Stamps November Release

Good morning and welcome back...
Today over on the Paperbabe Stamps blog we are showcasing the right facing 3/4 view version of the dinky female face, the perfect pose for so many projects...
 I think most portraits have the face slightly angled, it shows a lovely natural look. I have been really looking forward to showing these off!!! 

Here's goes, onto some samples...
The watercolours came out for this card, I've added a crown of flowers, I mostly used the flowers from the sugar skull stamp sets, with just a couple from the sketchy rose set.
It did require some masking to get the flowers this way, they were all stamped in versafine as I knew I wanted a waterproof ink.
I've inked the edges with distress inks and left it blank, I could stamp any sentiment on there or simply leave it as it is.

Next...
 there's 45 sleeps until christmas, I think I might need to make much more of these, lol
 I just love to colour hair, and  copic markers are one of my favourite mediums to use for this, you can get fine lines and add layers without having to wait for ink to dry. I didn't jot down all the colours that I've used but as a good guess...
Copics List ~ Face: E0000, 00, 04, R00, RV91, B60. Eyes: B01, N3, W8. Hair: E31, 35, 37, 49, 59. Jumper: R24, 27.
For the Background I used B01 around her body, used the templates as masks to then stamp the snowflakes in tumbled glass Distress Oxides.
 You can just make out the texture on the jumper, I stamped the knit with barn door Distress Oxides over the copic.

Last but by no means least...
 I really wanted to create something whimsical and mixed media, not sure how well it worked but I enjoyed painting it and isn't that the real joy of creating.
 I've used matt acrylic paints onto cold pressed watercolour paper, I wanted to have the texture. I have used layers and pretty much dry brushed the build up some depth to the image.
I added a crown to her, also painted but with accents of gold ink, to give it an aged metal look.
I fussy cut her out and added pencil shading.


Do visit the rest of the team to see their amazing creations...


Thanks so much for stopping by, 
Enjoy a wonderfully creative day ♥ and
hope to see you tomorrow for one more project and release day...
HuGs Kim x

Thursday, November 14

Introducing ~ Paperbabe Stamps November Release

Good morning, have you like me been hiding indoors with all the freaky hail stones this month?
Today over on the Paperbabe Stamps blog we are introducing new Stamps and Mixed Media Templates.

This is the 3/4 view version of the dinky female face, the perfect pose for so many projects. I think most portraits have the face slightly angled, it shows a lovely natural look. I have been really looking forward to showing these off!!! 

Here's goes, onto some samples...
  This card features the whimsical waves, so flowy, inspired by my original drawing of Maoleidigh. I opted for copics onto kraft cardstock, it's a bit of a hit and miss with the colours showing up but I do love the finished look. 
Copics List ~ Face: E0000, 00, 04, 31, R00, 02, RV91, B60. Eyes: B01, N3, W8. Hair: BV23, V12, 15.
 I die cut an oval from a sheet of mylar, to use as a stencil to create this oval for her to sit in. I decided to have some of her hair falling out of the frame.
 The background I used the yummiest of Spica copic pens, in mint, love the look.
 It's hard to see but I went around the edge in gold ink, it's much more noticeable in real life.

Next...
 I love this micro fringe, reminds me of the very elegant Audrey Hepburn or more funky like Uma Thurman (pulp fiction) or Audrey Tautou (Amélie)
 The weather did not help photo taking this week... I used a grey tone for her skin, wanted that pencil look, not sure it is showing like that in the photos though.
 I have heat embossed the crown in gold embossing powder to hide the big blobs of copic ink that decided to drop onto my project. I think you can just see two funny blobs behind the crown, but I guess you probably won't have seen it unless I said anything lol. The template is perfect to mask my girl ready for some background stamping using the isometric fun stamp set with a few features gold embossed too.

And last project for today anyway...
 I've been enjoying making myself these large stickers, they're a great little project, they can be any size really, you could make just heads or add torso's and have fun with experimenting with colours too. Plus they can be used in your planner or art journal, mixed media creations whenever they're needed.
 Here is the messy buns template, the 'bun' is separate so you can add as many or as few as you wish, or add them to some other hairstyle. It's completely up to your creative imagination.
 I've used it with the cute pixie ear face stamp. I chose to use my copics with a darker skin palette, 
Copic List ~ Face: YR31, E21, 25, 27, 59. Hair: W10, E49. The sticker paper doesn't do very well with blending, but a reasonable result, they're still very addictive!

Do visit the rest of the team to see their amazing creations...


Thanks so much for stopping by, 
Enjoy a wonderfully creative day ♥ and
hope to see you tomorrow for more introductions...
HuGs Kim x


Friday, November 8

Paperbabe Stamps Challenge #106 ~ Anything Goes

Good morning, great to have you visiting, we have a new challenge on the


It's a fun and easy anything goes...
 I created this girly card, it could be for best friend's, sister's or even partner's... you could change these girl's up to suit any of the friends you know IRL!
I've used the dinky female face stamps with the wavy central parting and loose plait mixed media templates, they're in the same set. 
I went for a simple colour palette, I love the strong black against the soft colours... I also added a hat and a bit of clothing, nothing complicated, I've used the torso template, and simply added some stitching lines. The jacket has a tad more detail, but still fits into the same torso shape.


Click pics for direct links


Enjoy a wonderfully creative weekend
HuGs Kim x

Friday, November 1

Paperbabe Stamps Mid-challenge Reminder...

Hello everyone!!!
Hope you're having a lovely week,

There is still plenty of time to take part in our current Sketch challenge...
and I'm sharing my project for a mid challenge inspiration...
So I've created a Halloween inspired card, it's been ages since I've made a 'card' seems strange lol.

Check out the vintage pattern papers, a Pink Paislee, called bayberry cottage, possibly discontinued now.
I started by creating my witch using the dinky face with the torso template and the fringe part from the loose plait hair templates
I added a witches hat and bat wings from two different digi's and sized them to coordinate. These represent the three elements from the sketch lol.

She has been coloured with copics, definitely found my love for these pens again... I went for a grey tone for her skin, with a little sparkle in her witchy eyes.
BV 23,25,29/N0,1,2,3/R00,85/G000/100


click pics for direct links


---------- ~ • ~ ---------- ~ ♥ ~ ---------- ~ • ~ ----------


You can find all the details of the challenge and how to enter HERE.


Thanks for stopping by today,
Enjoy a wonderfully creative spooky weekend!
HuGs Kim x

Friday, October 11

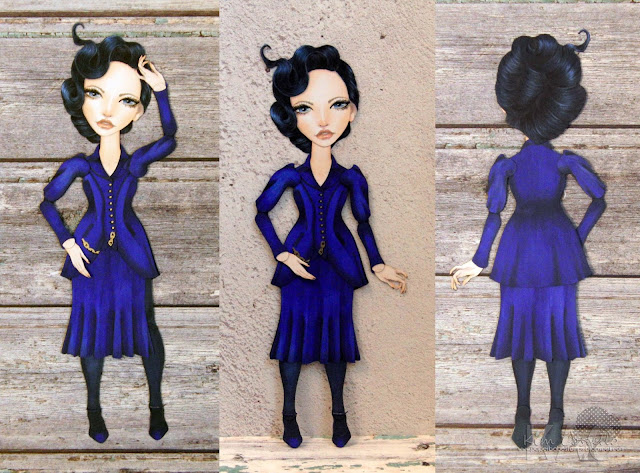
How Peculiar? A Poseable Miss Peregrine Paper Art doll ~ Fan Art!!!

Good morning, great to have you visiting, we have a new challenge on the paperbabe stamps blog today...

The theme is 'movie night'... which movie?... hmm decisions...
I did plan on creating a art journal page using my templates and stamps for a bit of Adventures of Sabrina fan art but realised that was a series, although binge watching feels like a whole movie night lol! So instead I opted for the movie Miss Peregrine's Home for Peculiar Children if, like me, you love all things Tim Burton then this fan art is based on the fabulous Miss Peregrine.
I have been so eager to create a poseable paper art doll, it's been ticking over in my creative brain for some time. Then it really clicked when I realised just how to make the joints without brads...
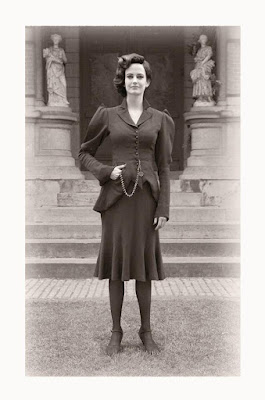
...delighted with myself I just had to put this together. I've used the female face dinky stamp set as the base, and drew some peregrine style hair. I've designed a jointed art doll base but then used the picture below to inspire the costume design, which I drew and coloured using copics.
Her hands are one of my favourite features, although I think maybe her sleeves could have been a little longer.
It's double layered as I wanted to create a back too.. I think taking the photos took me so long as I was too busy posing and playing than clicking hahaha!
You can just see there is also a chain from the the bottle of stamp set heat embossed in gold. Too fun, I already want to put another one together.


Thanks so much for stopping by, let me know if you'd like to see a jointed poseable art doll kit in the shop?

Click pics for direct links

Copics list as I forgot the photos...
Face/skin: R000, 00, 01, 21, E0000, 000, 04, RV91, B60, C2
Hair: B23, 39, 99, BV29, C10
Outfit: B39, 69, 99


Enjoy a wonderfully creative weekend
HuGs Kim x


All Craft Sites

Since 21.08 You're Number...

Top 40 Arts and Crafts Websites