Showing posts with label Color Me Copic. Show all posts

Friday, July 16

Color Me Copic's ~ First Challenge


Over at the Color Me Copic blog... the very talented Rach has put together a wonderful tutorial on colouring your images in black & white and to celebrate we thought we would also have the theme as a challenge for all of you too. The Greeting Farm has very generously provided a fantastic prize too!


Here's my sample I thought these beautiful cheekies would suit the black and white theme very well. I decided to opt for old type photographs, but instead went for a Polaroid look! Which I have created by cutting my white cardstock with a square nesty and the picture part is a rectangle! Enhanced the aged look with a little distress ink!


I have created the tickets by stamping up the ticket in a line, with black ink directly onto kraft, trimming the sides and my crop-a-dile came in very handy for the holes. I've used the viva decor pearl paint using the Bazzill jewel template for the line of pearls.

Supplies: Patterned Paper: pink paislee: queen bee;
Stamps: The Greeting Farm: Cheeky beauty; Cheeky glamour; Inkadinkadoo: paperwork greetings;
Ink: Memento & Archival: black; Copic: markers*;
Ranger: distress inks: antique linen; Viva Decor: pearl liner;
Dies: Spellbinders nestabilties: squares; rectangles;
Other: Bazzill jewel template; crop-a-dile; 3D foam;
 
*Skin: E40, 41, 43, background and outfits: W-1, -3, -5, -7, 100 and the colourless blender!!!
  
I've based my card on the Friday sketchers #110, although I made this card the other day I just haven't had the chance to post it! so, hope you pop back tomorrow for a fabby Club Anya & Friends sketch!
BiG HuGs Kim :)


Friday, July 9

Copic Colouring Tutorial ~ Background Grass


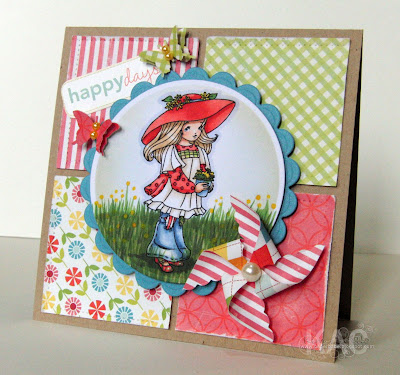
Good morning, well... here it is my step by step tutorial on how I colour my grass... I have also placed it on our Color Me Copic blog too... Hope it inspires....
 
First I stamp my image then cut out the desired shape, it's so much easier for me to re stamp then recolour an image if I didn't cut it properly, also it's easy to realign the die on the image to ink the border edge.

I have coloured the main figure with copics and given a soft shadow around the edge of her...*Skin: E000, E00, 11, 13 & R20, Hair: E50, 51, 31, Outfit: R22, 24, B91, 95, E41, B60 and a little colourless blender!!!

 
Here are the varying greens I've chosen but by no means do you have to use these... any greens will work, I have a light, medium, darker and the darkest for shadows. The yellow will be the flowers but again any colour which suits your project will work!
I start by colouring my grass area, you can have this any size, maybe a mound, or small grassy verge... I have used YG93 and just coloured... you really don't need to be neat with this bit as it's going to be covered with LOTS of grass!!!

Next colour... I've used YG17, now just flick... starting at the bottom of your blade of grass flick the pen up, it will naturally tapper for you and try not to go straight up either a few stray directions make a more realistic grassy look!

I have covered the whole base colour with YG17 blades of grass, notice I have flicked a few strand directly over her shoes and trouser hem! This gives a more earthed impression of her standing in the grass instead of on top! You won't want any on the tops of her trousers though (unless the grass is super long and tall).

Right my next colour, YG67 is a darker tone of green and this will give depth to the finished look... simply follow the previous grass flicking instruction with this colour, you will not need to cover as much area so you won't cover over the lighter blades. To really ground her I have taken my darkest tone BG96 and dotted around the base of her shoes and continued out a little to create a shadow!

The flowers are so fun... using Y08 dot directly onto the grass, hold the tip there for a little bit, the green will bleed out and the yellow will remain... continue this all over, it is very random colouring!

Don't forget the top of the flowers too, you won't need to hold the tip there this time as there is no colour to move. In fact a very gentle dab will produce a lovely tiny dot.

Ooh finished, just check now if I think there's enough shadow and contrast maybe add a little more to the shadow under her feet. You might have noticed I didn't need to use one of the colours I originally chose. This is also where I will replace the nestability die and blend a little distress ink to the edges.

Here is the image placed on the card front!!!

Supplies: Patterned Paper: Echo Park - Sweet Summertime Collection Kit;
Stamps: SCACD:Go Greenlittle suzanne(from the last release);
Ink: Memento: black; Copic: markers*; Distress inks: antique linen;
Dies: Spellbinders nestabilties: circles; MS: butterfly punch;
Other: Flat Backed Pearls - 3mm - Golden Yellow; Flat Backed Pearls - 8mm - white; brad; scallop scissors; stitch tracer; 3D foam;

Thank you so  much for visiting today, stop back tomorrow for a Basic Grey Challenge and Club Anya & Friends Sketch Saturday.

BiG HuGs Kim :)

Sunday, May 30

Come and Join us....


We're so excited to announce the new Color Me Copic blog is now open!!! The first few days will be team introductions and then our first informational post will be up next week. Come join us ladies... Rachel, Amy, Traci, myself and Elaine!


Friday, May 14

Color Me Copic.... Coming Soon


So, a few of us fellow copic lovers know as Rachel, Amy, Traci and myself decided to get our heads together and form a little informational blog called “Color Me Copic” and it’s launching on May 28th!

This isn’t a challenge site and we aren’t selling anything, we’re just Copic lovers like you who wanted to put some information out there because we get asked a lot of questions and want to help you out. There will be photo tutorials, video tutorials and you are free to ask questions, we are here for you!

So hope to see you there, HuGs Kim :)


All Craft Sites

Since 21.08 You're Number...

Top 40 Arts and Crafts Websites