Pages

Wednesday, July 27

Distress Stain Picture frame

Hello there, wanted to stop by with a little gift idea I have over at Quixotic
I wanted a gift for my sis from my two little ones, the top picture is of the handsome Dillon, then a little drawing he did in the middle and last but by no means least the adorable Maoleidigh! Not sure the photo shows them very clear!


 I have stained the wood with Tim Holtz Distress Stain - Broken China, love the result! Then I have stamped Stempelglede - Grunge Collection on the frame and enhanced with perfect pearl powder.


Then embellished with Viva Decor: Glitter Liner - Holo Iridescent, I also rubbed a little of the glitter onto the frame too! 

Okay so... this will be my last post for a while as I'm having a blogging break...
Thank you so much for stopping by hope you have a fabulously creative day!
BiG HuGs Kim :)

Monday, July 25

Love Life and Live ~ Steampunk Top Hat & Stand

It's MONDAY!!! which means, we have a new theme set at...


and this week is Anything Goes!!!


WOW my final project as member of this Awesome Team sniff sniff.
I was inspired by these Steampunk Debutante papers.


I had the idea to create a steampunk inspired top hat, using grungepaper, texture fade, cafe perfect pearls (fabulous match to the papers) and gears. The top and brim are cut using ovals nestabilities, and I simply pleated the hat into shape! I can see me making a whole lot more of these.


This is the back of the hat, wish I'd have thought to put the eyelets in before I constructed the hat ROTFL!!! but still, managed and threaded some copper coloured elastic through.


I even lined the inside with fun flock, I mixed a few colours together to get this shade!


The Small easel is the base for the hat stand adhered to a large fragment, adorned with Art Parts and memo pin embellishments, one dangly using Steampunk gears stamp.


I cut flowers from Tattered florals and 3D flowers using grungepaper and the colours were matched using distress inks. So check out the goodies at...
Photobucket
And then why not pop round to the rest of the team's stunning projects!!!
THE director ~ Linda Elbourne
Candy Colwell ~ Dan ~
Kim Costello <~ You're already here
Sarah Engels-Greer ~ Terry Wietsma-Girbes.

Thanks so much for stopping by, have a beautifully creative day!
BiG HuGs Kim :)

Wednesday, July 20

A Person's A Person, No Matter How Small!

Here's a card I have over at Quixotic today,
I am so pleased with how it turned out it must have been one of the quickest cards to make and loving all the colours from these Crate papers. I totally adore Horton hears a who film...  which is the reason for buying this fantastic Artistic Outpost - Think & Wonder stamp set. Featuring quotes from Dr. Seuss... A person's a person, no matter how small. Just love it!!! The Pink Paislee - Artisan Elements - Swirls I have coloured using Tim Holtz Distress Stain - Weathered Wood, I blasted it with my heat gun and it dried on very nicely!
The faux Stitching was created using the WRMK sew easy and a black fine liner for the stitches.
I was inspired by the sketch over at Card Patterns...

Thank you so much for stopping by hope you have a wonderful creative evening!
BiG HuGs Kim :)

Monday, July 18

Simon Says Stamp and Show Some Embossing!

It's MONDAY!!! which means, we have a new theme set at...


and this week is Some Embossing!!!


I have incorporated both heat embossing and dry embossing!


The cover to my mini sketch book has been doubled distressed using Victorian velvet, aged mahogany, walnut stain and black soot distress inks. Using a gorgeous texture fade.

The leaf art part has distress stain and clear embossing powder.


The spine has been adorned with an array of different embellishments! All quite meaningful, the leaf back to my natural artist passion, the butterfly to learn to change, the pearl for keeping pure, the lock and key to unlock my skills and then imagination! Phew! far tooo deep for a Monday morning ha ha ha!


I have been holding hoarding onto these scrummy cotton rag art paper for ages it was so nice to make something I might use with them. I've used an old sizzix cheque book die, sorry not sure if you can find it now.


These embellishments are made using clear art film and Tim Holtz kraft resist card!


Then I created inked tabs along the edge using inspirational words.
So check out the goodies at...

Photobucket

And then why not pop round to the rest of the team's stunning projects!!!

THE director ~ Linda Elbourne
Candy Colwell ~ Dan ~
Kim Costello <~ You're already here
Sarah Engels-Greer ~ Terry Wietsma-Girbes.

Thanks so much for stopping by, have a beautifully creative day!
BiG HuGs Kim :)

Monday, July 11

Stitches? and Stitching!!!

It's MONDAY!!!
I'm very late posting so much going on at home, it's really came to a head with a weekend spent in the hospital as Dillon suffered a head injury that needed surgery, there must be over seventeen stitches along his hairline... bless him, he's fit and recovering extremely well from it all!

which brings me onto the new challenge at...

and this week is Stitching!!! I know!!!

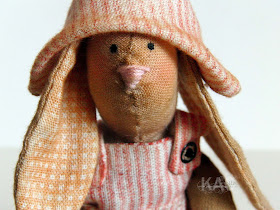
I completely indulged in my love of sewing for this challenge, creating a very aged looking bunny from a Tilda pattern.
 
To start, the bunny's muslin fabric was stained with antique linen and vintage photo distress stains. I definitely needed my scrubbie after that!
The ear lining and outfit are stamped with Wendy Vecchi's fabulous ticking and check background stamps, using distress ink directly onto the fabric. So pleased with how it came out!
The front I simply stamped this wonderful flower and finished off with some poppers.
So check out the goodies at...
Photobucket
And then why not pop round to the rest of the team's stunning stitched projects!!!
THE director ~ Linda Elbourne
Candy Colwell ~ Dan ~
Kim Costello <~ You're already here
Thanks so much for stopping by, have a beautifully creative day,
give your loved ones BiG HuGs!!!
Kim :)

Wednesday, July 6

Creepy Crew - Syren

Here's a little project I have over at Quixotic today,
I have been eager to colour this fabulous Creepy Crew - Syren from the greeting farm and had such fun! I have fussy her out and sprayed a generous amount of glimmer mist hard to see in the pic!
 I cut the swirls from the Marianne D Creatables - Frames/Swirls LR0116 adhered around for splashes and finished with a sentiment on the frame of Frames/Swirls LR0116!
The colours are inspired from the gorgeous Cosmo Cricket - 6" x 6" Mini Deck - Salt Air designer papers.
and this is the selection of copics I've used... nearly forgot to photograph them!
and here is a few challenges I'm entering...
Mystery Monday ~ with croppixie
Papertake weekly ~ Anything goes
SirStampalot ~ Anything goes
Thank you so much for stopping by hope you have a wonderful creative evening!
BiG HuGs Kim :)

Monday, July 4

Simon Says stamp and Show a Flourish

It's MONDAY!!! which means, we have a new theme set at...


and this week is a Flourish!!!


I've used flourishes in a few ways, some are cut from chipboard using the elegant flourishes die, then applied paint dabber. 


It's a little hard to see I have stamped the swirl from Wendy Vecchi set onto the flowers, using some fabulous Glassine papers.


The frame on the card has been painted with crackle effect. The sentiment is stamped on patterned paper.


Butterflies from this set have been heat embossed onto clearly for art film.


The Maya road cameo has been painted, inked, stamped with this cute set and glossy accents to finish.
So check out the goodies at...
Photobucket
And then why not pop round to the rest of the team's stunning projects!!!
THE director ~ Linda Elbourne
Candy Colwell ~ Dan ~
Kim Costello &lt;~ You're already here
Thanks so much for stopping by, have a beautifully creative day!
BiG HuGs Kim :)

Saturday, June 25

Quixotic & Make it Crafty Celebrations!!!

Today is a joint celebration! As you may be aware, this is the month that Quixotic Paperie turned TWO! What you may not know is that it is also the month in which Australian company Make it Crafty is turning ONE!

Quixotic Paperie have been stocking the fantastic Make it Crafty range of products (Rubber Stamps - Lasercut Chipboard - Make it Colour Blending Card) since April 2011, and are one of the first places you can find them outside of Australia! We are thrilled to be celebrating with Make it Crafty today.


For my card I've used Make It Crafty - Mushroom House coloured with copics


To celebrate we thought that rather than a blog hop we would set a CHALLENGE using Make it Crafty products! To get inspired, hop on over to the Make it Colourful challenge blog where you will see the amazing creations our fabulous DT’s have created for this event! PLUS find out all the details on how you can play along!

OF COURSE THERE ARE PRIZES!

There are FIVE challenge categories and there will be FIVE GRAND WINNERS!

PLUS, PLUS, PLUS

There will be random winners throughout the whole month. The numbers have been pre-selected and as soon as an entry is added that matches that number they WIN! Winners will be announced soon after entry on the sidebar of Make it Colourful.

PLUS there’s MORE!!!

Quixotic Paperie have a little something for you too!! Make sure you pop on over to HERE to enter your name for a chance at MORE Make it Crafty Goodies!!

PLUS THERE’S MORE!!!

Zoe, the owner of Make it Crafty has a super duper HUGE Candy give away – choc-a-block FULL of Make it Crafty goodies!! AND I have heard a whisper that she is planning on having random giveaways on her blog throughout the month of July! All you need to do is leave her some love as she’ll randomly be choosing people who have commented on her posts throughout the last year!

PLUS THERE’S EVEN MORE!!!

You’ll also receive a set of steak knives when you... hahaa ONLY Joking BUT... for THREE DAYS ONLY you’ll be able to get 40% off Make it Crafty Digi Stamps when you enter the coupon code: CELEBRATE (Ends June 28th)

So I do hope you will celebrate with us this month and get into the Make it Crafty spirit of FUN!!

Wednesday, June 22

Gift Set Tutorial

Over at Quixotic today I have a written a little tutorial on...
 creating a pencil and notepad gift set, so easy to customise and give as a special gift.

To begin take the cover off a mini notepad or jotter,
remove it on the back too Cut some kraft cardstock to recover the pad remembering to continue the cover to the back.
Use a corner rounder to shape the corners, simply hold a few pages at a time instead of struggling with too many.
Stamp A Pen Friend image on the front with coffee archival ink, ink edges.
Create a box envelope the depth of your pencils, I've used scallop circle die to give decorative flap.
Attach a large metal snap or (circle card and eyelet), then ink edges.
Secure some twine to the back before constructing the envelope.
For the cover cut three pieces of chipboard, two just a bit bigger then the box envelope and a spine the depth of pad and envelope.
Adhere patterned paper to the two large covers and ink the edges.
I've cut a strip of sticky back canvas for the spine, lay the covers and spine directly onto the sticky side allowing a gap between pieces.
Then adhere another strip of patterned paper to cover the two ends, and score the channel's to secure.
Next it's simply a matter of adhering the pad and the pencil envelope in place.
I've added more twine for tying a closure.
For the front, stamp and colour your image, fussy cut leaving a border and matt onto black card, then fix on the front with dimensional adhesive.
and here's the copics I've used!

I hope you feel inspired to try creating a little papercrafted gift too!
Thank you so much for stopping by today!
BiG HuGs Kim :)