Pages

Thursday, December 31

Final Wild Sprout and Day of 2009...

"Woo Hoo!!! are you ready for the 4th and final Wild Sprout? Designed and styled by our very talented Amy... let me introduce you to THE cute and SASSY Stella...


Can you believe it's New Years Eve? I've had an amazing 2009 and still trying to fit a load more into it too LOL! But it means you will be able to get hold of these four stunning Wild Sprouts and the fun Talk Loud set tomorrow at the Greeting Farm.
The sweet and Sassy Stella has been coloured with my copic markers. How stylish is this girly I love her smart look and sleek hair style is gorgeous!!!
I have die cut these flourishes from coordinating paper, layered with double sided adhesive sheet on the top so that I could sprinkle on some fine glitter.. it is of course so difficult to capture all the sparkle. and I have made a little ribbon embellishment to represent the third rectangle in the sketch.


Supplies: Patterned Paper: BasicGrey: Sugar Rush; Stamps: TGF; WS: Stella (release 1st); Talk Loud (released on 1st); Ink: memento: black; Copics: markers; Die's: Spellbinders: circles; Sizzix: heart; Cuttlebug: flourish border; Other: Polka dot ribbon; double sided adhesive sheet; fine glitter; decorative pin; Dimensional adheisve foam;
And here's the copic colours I used...
Skin & eyes: E000; R30; E95 & G21;
Hair
: 100; N3; N1;
Clothes: B45; B21; R39; RV10;

Be sure to head over to Club Anya and the Greeting Farm's blog to see even MORE beautiful sneak peeks of the Gorgeous Stella and if you're playing along we're now on the 11th Day of SKETCHES! phew they've been so much Fun! Also we have a whole day of fun challenges and prizes tomorrow too, to celebrate Club Anya and Friends!

Now I have to apologise for not being round very much I'm still visiting family and have other crafty projects on the go and haven't had the time to reply to your wonderful thoughtful comments! They Mean so much to me and brighten my day... I will be back on track soon and looking forward to catching up with you all,

BiG Happy New Years Eve HuGs Kim :)

Wednesday, December 30

Club Anya and Friends Preview...

Good morning, I am SO excited to be back with yet another day of PREVIEWS at Club Anya,


Introducing the sweet eclectic Gigi designed again by the very talented
Amy. She's got her own style, although I took the hippie look... think it was the colours in these new Basic Grey papers! Delish!

I used TGF Sketch #10 and have die cut some greenery to adorn the panel with Gigi! The 'Talk Loud' sentiment stamps are so fab and fun I have coloured the birdie with my copics too. The panel layer I have ripped to get the two shapes and all raised on dimensional adhesive foam.


Supplies: Patterned Paper: BasicGrey: Origins; Stamps: TGF; WS: Gigi (release 1st); Talk Loud(released on 1st); Ink: memento & archival: black; Copics: markers; Die's: Spellbinders: labels 8; Sizzix: branches and leaves; Other: Wide grosgrain ribbon; adhesive gems; 3D foam;

As a treat and because quite a few ask me, I thought I would include the copic colours I used...
Skin & eyes: E000, R30, E95 & B41
Hair & Band: E53, E50, E31, 0 & Y08, E47
Clothes: 100, YG00, YG93, YG67, E39, E57

Now be sure to head over to
The Greeting Farm's blog to see even MORE beautiful sneak peeks of the Darling Gigi and if you're playing along we're now on the 10th Day of SKETCHES! Wow!


Thanks for stopping by and yes there's another preview tomorrow too!!! Also to mention that on the first Our HUGE "IN WITH THE NEW at TGF" BASH will begin at 9am CST (3pm UK time) on Friday, SO many prizes....SO many chances to WIN! All to celebrate our NEW YEAR, NEW Club Anya & Friends Blog...and NEW RELEASE with ALL your friends at The Greeting Farm! Hope to see you there, HuGs Kim :)

Tuesday, December 29

Club Anya preview and 9th day of Sketches!!!

I'm SO excited to be back with another day of PREVIEWS at Club Anya....soon to be Club Anya and FRIENDS in 2010!

I also want to welcome
LYSA ROHRER to Team Anya 02 as our next Guest Designer! We are THRILLED to have Lysa on board with us for the next three months and I can't wait!!! So if you get a chance pop over and check out her amazing work!!!

Meet Ruby, also designed by the magnificent Amy... isn't she so cute, fun, funky and totally fashionable? LOVE her! Ruby will be coming to you on the 1st of this month during our HUGE New Year's Day RELEASE PARTY and GRAND OPENING of CLUB ANYA and friends!
I used sketch #9 from TGF's 12Days of Sketches designed by the wonderful Jessica and coloured the sweet Ruby with my copic markers. I have added some tinting with distress inks.

Supplies: Patterned Paper: Crate paper: little Sprout; Stamps: TGF; WS: Ruby(release 1st); Talk Loud(released on 1st); Ink: memento: black; Brilliance: coffee bean; Copics: markers; Tim Holtz: distress inks; Die's: Spellbinders: ovals; labels 8; EK success: border punch; WRMK: corner punch; Other: lace trim; adhesive gem; stitch tracer; 3D foam;


Don't forget that the 12 Days of Sketches are still well underway on the TGF Blog! Everyone is having a great time and there are more fun sketches to be used today! This contest will also run through Sunday 1/3/10 at 8pm CST to complete them and upload them to the appropriate galleries) will be entered into a drawing to win the ENTIRE TGF JANUARY RELEASE!!!


Now be sure to head over to
The Greeting Farm's blog to see even MORE sneak peeks of the fabulous Ruby and the 9th Day of SKETCHES! Wow!
Thanks for stopping by and yes there's another preview tomorrow too!!! HuGs Kim :)

Monday, December 28

Club Anya Preview and some WILD News!!!

Hello everyone did you all have the best time this Christmas? 'Phew' we're still in the middle of visiting people and giving out pressies. Although we've had the best time ever this year and it has been non stop fun. Dillon managed to lose his front tooth too... bless him as the tooth fairy has a day off on Christmas day (ROTFL). But there's even more news to share....
I am SO excited today as for the first time EVER, TGF and Club Anya are JOINING FORCES yes we're previewing our new releases together for the HUGE JANUARY RELEASE BASH that's only days away!


We are SO excited to be previewing FOUR NEW SPROUTS....ALL styled by our very own Team Anya member... the talented AMY YOUNG! WHOO HOO!!!!!! Congrats Amy! Today's little cutie is named Chelsea.
I have coloured her with copics and yes I received a new set over the holidays too... fabulous surprise!!! This is Basic Greys new collection and I LOVE the greys and oranges together.

In addition, the TGF DT has another sneak peek at a SUPER fun new set called "Talk Loud", a word-art sentiment set that is new, totally fun and something we've never done before at The Greeting Farm! Be sure to check out samples from ALL of the TGF DT and Club Anya as you'll be nothing short of amazed!

Supplies: Patterned Paper: BasicGrey: Sugar Rush; Stamps: TGF; WS: Chelsea (release 1st); Talk Loud(released on 1st); Ink: memento: black & grey; Copics: markers; Tim Holtz: distress inks; Die's: Spellbinders: ovals ; Fiskars: border punch; WRMK: corner punch; Other: ribbon; adhesive gem; 3D foam;


I'll be back with another cute sprout design tomorrow, but first, I have a few announcements for the week:

*Our HUGE "IN WITH THE NEW at TGF" BASH will begin at 9am CST on Friday, 1/1/2010 and run through 8PM with challenges, prizes, and FUN! Each challenge winner will receive a new Sprout of their choice, so be here to party with us! Live overseas? No problem! Challenges will be open through SUNDAY, 1/3/10 at 8pm CST. WINNERS will be announced on the TGF blog and CA blog on Monday, 1/4, along with the winner of the 12 days of Sketches contest. That winner will win the ENTIRE Jan. release.

In addition to each individual challenge, ANOTHER prize pack of the ENTIRE Jan. release will go to a random winner who completes ALL of the New Year's Challenges!

*Don't forget that the 12 Days of Sketches are still well underway on the TGF Blog! Everyone is having a great time and there are more fun sketches to be used today! This contest will also run through Sunday 1/3/10 at 8pm CST to complete them and upload them to the appropriate galleries) will be entered into a drawing to win the ENTIRE TGF JANUARY RELEASE!!!

SO many prizes....SO many chances to WIN! All to celebrate our NEW YEAR, NEW
Club Anya & Friends Blog...and NEW RELEASE with ALL your friends at The Greeting Farm!

Thanks for stopping by and hope to be back tomorrow BiG Happy HuGs Kim :)

Wednesday, December 23

The Greeting Farm sketch(s) #4 & #5

So continuing with the TGF's 12 Days of Sketches!...

I did do yesterday's 12days sketch but I just couldn't bring myself to post it, I really am not pleased with it (OK you can scroll down to see it...ROTFL!), I think I was feeling too tired and just plonked the elements on but I've made one for today's sketch which I am much happier about...


I went for an old black and white photo effect and coloured her in greys and stood in a little wild garden... I tore round the edge using my ruler and scrunched the image up 'arrghhh' but fun and inked all over with some distress inks!

I've added pearls to represent the extra rectangular layer. LOVE this elastic ribbon... how fun with it's little frilly bit?


Supplies: Patterned Paper: October Afternoon; Stamps: TGF; Izzy; PTI: sentiment; Ink: memento: black; Copics: markers; archival: black; Tim Holtz: distress inks; Die's: Spellbinders: circles; MS: border punch; Other: Prima: paper rose; frilly ribbon; Zva: adhesive pearls; 3D foam;


So Here's the other one tee hee I had coloured the fabulous Edward ages ago and decided to use him...


As you can see I have turned the sketch on it's side.
I think this may have been card attempt number three too, just a bad cardmaking day!!! Oooh Jo will be happy... hey hun this is the bad one...LOL!
I have coloured Edward in copics and covered his skin in Spica glitter marker... so he sparkles just like he does in the sun! Not much else going for it really a few plonked papers LOL!


Supplies: Patterned Paper: Sassafras: Core'dinations: Black Magic; Stamps: TGF; Digi Edward; Ink: printer: black; Copics: markers; Other: 3D foam;

Wow Christmas Eve eve how fun hope you're all very excited like the little ones and ready for lots of fun festivities with family and friends... I'm not very organised and have yet to wrap anything... considering I've been waiting for a parcel to arrive that I ordered on the 13th from the Early Learning Centre... Not a happy bunny with that company and now have to go into town tomorrow and re buy everything... (fingers crossed they have it all) OK... Enough of a rant and moan. I wish each and everyone a special Christmas although I hope to post another message tomorrow so until then Big Happy Christmassy HuGs Kim :)

Monday, December 21

"on the 3rd Day of Sketches..."

The Greeting Farm challenged me...
Hello... oooh it's Monday and 3 days before Christmas eve? I am SO excited!!!!! And I'm bringing you another card for the 12 Days of Sketches... I know amazing hey? Lets see if I can keep it up LOL!

So pop over to The Greeting Farm blog you will find today is SKETCH #3 by the wonderful Mercy and you can also find a place to upload them in the TGF GALLERIA!

So thought this adorable Eva would make a cute little Christmas fairy and have coloured her in Christmassy poinsettia dress tee hee. Hope you can see the shimmer mist on the close up it's so pretty. The sentiment is from Xmas Sweetie's set and I have just stamped them onto tags and tinted.
You may have noticed that I'm really enjoying these larger ribbon's just totally loving them in fact I popped to John Lewis yesterday and these yummy satin ribbons were just calling to me tee hee!


Supplies: Patterned Paper: Cosmo cricket: jolly by golly; Stamps: TGF; Fairy Eva; Xmas Sweeties; Ink: memento: black; Copics: markers; archival: black; Tim Holtz: distress inks; Tattered angels: marshmallow glimmer mist; Die's: Spellbinders: label ; Sizzix: tags; MS: border punch; Other: PTI: button; John Lewis: satin ribbon; natural thread; decorative pin; 3D foam;
But before I sign off you might want to head over to the Club Anya blog because there is a HUGE announcement today involving a lot of FUN changes coming. You're going to be so excited!!!!
BiG HuGs :) ooo and I even managed to make one of Tim's tags last night too and I can see the addiction already... when It's completely dry I will take some piccie's! so until tomorrow Kim :)

Saturday, December 19

The Greeting Farm ~ 12 Days of Sketches #2

Each day a different sketch is posted, and you can also find a place to upload them in the TGF GALLERIA, today is SKETCH #2 by Mercy!

So continuing with the TGF's 12 Days of Sketches! Today's card is for my OH as we have a little anniversary coming up. I have used this really old paper, it was in fact the very first BasicGrey collection I ever bought and still have tons left LOL!
The flower has been cut directly from the patterned paper and represents the strip across the middle. I have stamped the sentiment on but it's a little hard to read. Me heart is yours ~ It reminds me of 'Pirates of the Caribbean'. Long time ago I had hair so red and long and of course my OH remembers this... You might just be able to see the glittery shimmer over the fairy too, try clicking on the picture to enlarge.
The wings I went for a mottled effect using my colourless blender to move the colours around. Well I hope he likes and already looking forward to their next sketch on Monday!


Supplies: Patterned Paper: BasicGrey: Stamps: TGF: spring fairy (digi); Matey: sentiment; Ink: printer & archival: black; Copics: markers; Other: American Crafts: velvet ribbon; BasicGrey: ribbon; Glimmer Mist: 3D foam;

Thanks for stopping by, HuGs Kim :)

Friday, December 18

The Greeting Farm ~ Day of Sketches #1

Are pleased to bring you....

TGF's 12 Days of Sketches! Yes Beginning today, 12 Days of Sketches on the
TGF BLOG incorporated with today's Farm Fresh Friday! With the exception of Sundays and Christmas Day, they will be indulging our stamping addiction with TWELVE awesome sketches designed by our own Cindy Haffner, Mercy Kerin, Jessica and Marie!

Each day a different sketch is posted, you can also find a place to upload them in the TGF GALLERIA, beginning with today, Sketch 1, by Cindy:

Wow I'm so excited now I can get to use my gorgeous stamps that are still in their packets 'Oh the shame'... so this is the first time I've inked up the beautiful Madelynn, stunning image and the colours are inspired from these yummy Basic Grey papers. Madelynn represents one of the rectangle strips in the sketch and the ribbon the other. The flower represents the heart shape... just so we're clear LOL! You can click on the thumbnails for a close look.

Supplies: Patterned Paper: BasicGrey: Nook and pantry; Stamps: TGF: Madelynn; PTI; sentiment; Ink: memento & archival: black; Copics: markers; Die's: Spellbinders: Ovals; Other: Prima: flower; Foof a la: buttons; natural thread; Adhesive gems; wide ribbon; 3D foam;

Thank you so much for stopping by and all your wonderful thoughtful comments on my tutorial yesterday wow I'm so pleased you liked it. Now as for copic colours I have one set of 72 sketch set D and a few greys that's all I use really, If I get a chance I will work out the colours I used for the my guy images. It was a snow day today woo hoo and I'm hoping to get a chance for TGF sketch tomorrow but what I would really love to do is Tim's twelve tags of Christmas so fingers crossed hey? HuGs Kim =)

Thursday, December 17

Flippin' Tutorial

Good Morning... I have posted this on the Club Anya Blog too and thought I would share it here too... So here it is, a tutorial showing how I made my little novelty flip book, so many of you remembered having one and were very interested in how I made it... well I hope my pictures help you create something special too!

I have printed off the Autumn Ian (I do quite a few to a page saves on printing more later) roughly about the scale of the rubber version so they will line up. (you will have to play with your own page/printer settings but there should be a way to edit you picture size) Simply take a ruler to your rubber to get the size.

Now you want to eye ball the image to be central where the die will cut. SO... while holding the die Mark the top central point. Remove die and Measure from the chin to the mark you've created. Jot this measurement down as you will need it for all of your pages.

Hold your ruler along the centre of the image and mark above head and below the feet with a little pencil mark to guide where the die will sit.

Lay the die in position and secure with a little low tack tape or de-tack on your clothes (or the palm of your hand gets rid of a good amount of sticky). Then cut with your die cut machine.


Simply erase any pencil marks and your first page is ready.


The same applies with your stamped image... Stamp in your usual ink...

Line up the ruler centrally as before and measure from the chin to the top of the die and draw pencil guides. Hope you can see I have '0' on the chin and I have measured from this point to above the head and a centre mark below the feet... just like in the first page.

Tape the die in position you should be able to use the same pieces of tape LOL and cut out. Continue with all your pages.

You will also need to cut a front and back to your flip book. I have applied double sided adhesive sheet to the back of my patterned paper before cutting and I will adhere it to some cereal box card so it's good and strong. Next have some fun colouring in your images.

Here I have made a jig to guide where I want the holes for my ribbon. I have simply cut a scrap of paper the same size as my pages and marked where I think the holes will go.

Here I have punched the cover and using my jig also means each page will get punched the same and they should line up to each other.

So... you should have the backing, the pages and the front cover all punched and they should line up with each other.

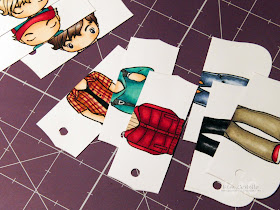
Now... it's time to cut off their heads arrrhhh this is the first scary bit, tee hee. You can use your jig too if it helps but I simply eye ball the blade to cut at the chin...

You can use this cut piece to line up the rest of your pages they should then match up with each other. If you have a good paper trimmer you might consider cutting a few pages at a time.

The next place to cut is at the hem of his top so the page will now be in three's - the head, the body and the legs.

Using ribbon or book rings it's time to simply secure your pages in place. Try it open so the ribbon isn't too tight on the hinge.

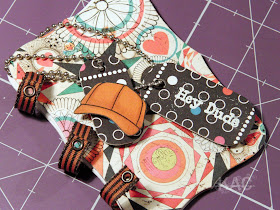
Check your pages and then decorate the front of your flip book.

Finished!!! I hope you get the chance to have a go and I'm very excited to see everyone's take on it so drop us a comment and let us know if you made one too!

Woo hoo only an week and Santa's on his way, tee hee hope you're all excited and ready for the festivities! Kelly should be gracing us with her talent tomorrow on Club Anya and there's something special to watch for starting at the greeting farm blog too! BiG HuGs Kim :)