Good Morning... I have posted this on the Club Anya Blog too and thought I would share it here too... So here it is, a tutorial showing how I made my little novelty flip book, so many of you remembered having one and were very interested in how I made it... well I hope my pictures help you create something special too! 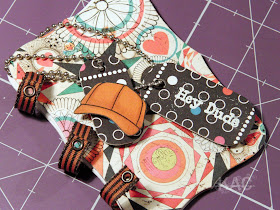
I have printed off the Autumn Ian (I do quite a few to a page saves on printing more later) roughly about the scale of the rubber version so they will line up. (you will have to play with your own page/printer settings but there should be a way to edit you picture size) Simply take a ruler to your rubber to get the size.

Now you want to eye ball the image to be central where the die will cut. SO... while holding the die Mark the top central point. Remove die and Measure from the chin to the mark you've created. Jot this measurement down as you will need it for all of your pages.

Hold your ruler along the centre of the image and mark above head and below the feet with a little pencil mark to guide where the die will sit.
Lay the die in position and secure with a little low tack tape or de-tack on your clothes (or the palm of your hand gets rid of a good amount of sticky). Then cut with your die cut machine.

Simply erase any pencil marks and your first page is ready.
 The same applies with your stamped image... Stamp in your usual ink...
Line up the ruler centrally as before and measure from the chin to the top of the die and draw pencil guides. Hope you can see I have '0' on the chin and I have measured from this point to above the head and a centre mark below the feet... just like in the first page.

Tape the die in position you should be able to use the same pieces of tape LOL and cut out. Continue with all your pages. You will also need to cut a front and back to your flip book. I have applied double sided adhesive sheet to the back of my patterned paper before cutting and I will adhere it to some cereal box card so it's good and strong. Next have some fun colouring in your images.
 Here I have made a jig to guide where I want the holes for my ribbon. I have simply cut a scrap of paper the same size as my pages and marked where I think the holes will go.

Here I have punched the cover and using my jig also means each page will get punched the same and they should line up to each other.
 So... you should have the backing, the pages and the front cover all punched and they should line up with each other.
Now... it's time to cut off their heads arrrhhh this is the first scary bit, tee hee. You can use your jig too if it helps but I simply eye ball the blade to cut at the chin... 
You can use this cut piece to line up the rest of your pages they should then match up with each other. If you have a good paper trimmer you might consider cutting a few pages at a time.
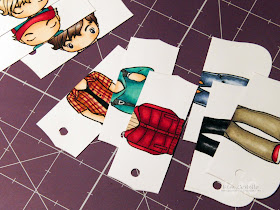
The next place to cut is at the hem of his top so the page will now be in three's - the head, the body and the legs.

Using ribbon or book rings it's time to simply secure your pages in place. Try it open so the ribbon isn't too tight on the hinge.

Check your pages and then decorate the front of your flip book.
 Finished!!! I hope you get the chance to have a go and I'm very excited to see everyone's take on it so drop us a comment and let us know if you made one too!
Woo hoo only an week and Santa's on his way, tee hee hope you're all excited and ready for the festivities! Kelly should be gracing us with her talent tomorrow on Club Anya and there's something special to watch for starting at the greeting farm blog too! BiG HuGs Kim :)


 The same applies with your stamped image... Stamp in your usual ink...

 Finished!!! I hope you get the chance to have a go and I'm very excited to see everyone's take on it so drop us a comment and let us know if you made one too!
whooo! this is truly AWESOME Kim :D
ReplyDeletexxx
(From my CA comment) Fantastic tutorial, I can't even imagine how long these take you! Really beautiful work though, my DD loved your other one I'll have to show her this one too ;0)
ReplyDeleteTotally, flippin cool!
ReplyDeleteYou are amazing! I can't get over your coloring, it's so beautiful.
ReplyDeleteThis is great and your coloring is FANTASTIC! I'll be giving you a shout out on my Friday Faves tomorrow :-)
ReplyDeleteLike I said on the CA blog... this is just amazing! The skill and patience you have to create such a work of art is out of this world! :)
ReplyDeleteThis is fantastic and I cannot BELIEVE you made another one!!! You are a ROCK STAR, Kim!!!!
ReplyDeleteKim - Thanks for making this tutorial! This is such a fantastic project!! :-)Traci
ReplyDeleteThank you! Your blog post will be advertised on the DigiFree Tutorials search engine today (look for timestamp: 17 Dec [LA 02:59pm, NY 05:59pm, UK 10:59pm] - 18 Dec [OZ 09:59am]).
ReplyDeleteWhat a fabulous project! I'm especially impressed with your colouring. What colour/s have you used for the denim jeans? They look so realistic!
ReplyDeleteOh this is brilliant.
ReplyDeleteluv
Debby
Incredible!!
ReplyDeleteHi Kim, you so rock. Thanks for the great instructions. I copied them off and put in my binder for a time when I can actually make them. I have a five year old niece that is soooo going to love this. Thanks for all you time that you put into this. Lisa G
ReplyDeleteThis card is divine I just love everything about it
ReplyDeleteWOW! This is amazing! :) I love it!
ReplyDelete