Pages

Monday, August 30

The Greeting Farm ~ Sweet Anya Preview

this is a scheduled post... please scroll down for simon says stamps and show :)

Hey everyone!

I'm back with another preview from The Greeting Farm! Did you all happen to check out the Club Anya & Friends blog over the weekend to see the ADORABLE new "Oh, Boy" Ian previewed with the Saturday Sketch Challenge? He's so cute! Well we've got a SUPER SWEET counterpart to show off to you today...

INTRODUCING...SWEET ANYA!


How sweet is this little cutie, I love her springy curls gorgeous!!!

Supplies: Patterned Paper: October Afternoon: fly a kite;
Stamps: The Greeting Farm: sweet Anya;
Ink: Memento: black; Copic: markers*;
Ranger: distress inks: antique linen; frayed burlap; blue;
Dies: Spellbinders ~ Nestabilities: labels; ovals; PTI: bloom die; Martha Stewart:border punch;
Other: Adhesive stones; grungepaper; Prima: lace; 7gipsy's: Bias ribbon; 3D foam;
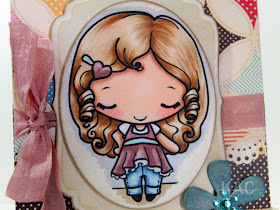
*Skin: E000, E00, 11, 13, Hair: E31, 35, 50, 51, Outfit: E04, RV34, B000, 91, 95, BG11, B60 and a little colourless blender!!!
 
You may remember this little 'sweetie' from the Design-your-Anya contest a few months back! Sweet Anya is the brainchild of Barbara Sproat, who just happens to be joining us today for today's preview! Please check out her creation and leave her some love! Without her, today wouldn't be as SWEET by any means :)

What's more? Barbara is GIVING AWAY a SWEET ANYA to one lucky commenter on her blog today, so be sure to visit and tell her how SWEET her design is!

And while you're at it, hop on over to the other DT's blogs because there are TWO MORE Sweet Anyas hidden away somewhere and you JUST MIGHT WIN one!

Barbara Sproat - our VERY special guest!
Alice Wertz - September Guest CA&F
Kim Costello <~ you're here :)

We'll be back on Wednesday with our "SWEET SEPTEMBER" Blog Hop, including the winners of SWEET Anya and LOTS more fun, so see you there and have a VERY sweet day, everyone!
 
Thanks for stopping by today, Big HuGs Kim :)

Simon Says Stamp & Show your... Layers!!!

this is a scheduled post...

Welcome... hope you had a wonderful weekend it's Monday which means.... A wonderful exciting


and this week... Simon Says Stamp and show your LAYERS

I've incorporated as many layers as I possibly could for this one... LOL! I started with #8 tag, layered and blended on some distress ink colours, thought I would try water stamping with forgotten garden image, then over stamped with distress ink to achieve another layer. I just HAD to spray a generous layer of gold perfect pearls mini mister mist! So that the sentiment wasn't lost amongst the colours I decided I would stamp it on a layer of vellum, then raised a few words from the text on adhesive foam.

 To give the tag another layer and dimension decided it needed a pocket... they're so many things layered on to this one... from the cappella patterned papers and the hugely layered flower created using Tim's tattered floral die and stamped with fabulous flourish. For the bird and branch I've added the bird as a raised layer, stamped and cut from grungepaper.

Supplies: Paper: Grunge paper; BasicGrey; Cappella#8 manilla tag; vellum;
Stamps: Tim Holtz: Urban tapestry; odds and ends 100th Set; Fabulous flourishes;
Ink: Archival: black; Ranger ~ Distress inks;
Dies: Sizzix ~ Tim Holtz: tattered florals; styled labels; elegant flourishes;
Other: Accoutrements; Glossy accents; perfect pearls: gold; Adhesive perals; Prima: lace; hemp twine; filmstrip ribbon; 3D foam;


Thank you so much for stopping by I hope you feel inspired and check out the rest of the teams stunning layers projects!!!

THE co-ordinator... Linda Elbourne ~ http://www.acraftingjourney.blogspot.com
Dan ~ http://dan99.blogspot.com
Katie Davis ~ http://chantillyrosecrafts.blogspot.com
Kim Costello ~ You're already here
Linda Coughlin ~ http://thefunkiejunkie.blogspot.com
Lori Hassler ~ http://www.ibeenthinkinboutinkin.blogspot.com
Lynne Forsythe ~ http://lynneforsythe.blogspot.com
Nancy Crissinger ~ http://whatsnextnancy.blogspot.com
Nancy Wethington ~ http://art-from-the-heart.typepad.com
Terry Wietsma-Girbes ~ http://www.cardscreativity.blogspot.com


Happy HuGs Kim :)

Saturday, August 28

The Greeting Farm ~ Sweet September Release

this is a scheduled post...

Hello all!

Can you believe those previews over on the TGF Blog yesterday? That new "Sweet and Toxic" Creeper set is going to be AMAZING to play with! We are really gearing up for a SWEET SEPTEMBER RELEASE and here at Club Anya and Friends, we have a VERY long-awaited addition to the TGF Family!

Before we introduce him (YES, I SAID HIM!!!) we have another introduction! Please help us welcome the ALICE WERTZ as our September Guest Designer for Club Anya & Friends! Most of you are probably familiar with her work as she has submitted some seriously FABULOUS entries in CA&F Challenges! We are thrilled to welcome Alice to the CA&F Family!

What's more? Today is SKETCH SATURDAY so here's the sketch for you all to enjoy today:


And what are we all using for today's sketch?
FINALLY....after LONG LAST...a BRAND NEW IAN!!!Introducing....

"OH, BOY!" Ian:

I may have rotated the sketch all the way round LOL, I wanted to add this little No. 1 magnet...

Supplies: Patterned Paper: Cosmo cricket: joy ride;
Stamps: The Greeting Farm: Oh Boy Ian;
Ink: Memento: black; Copic: markers*;
Ranger: distress inks: antique linen; frayed burlap;
Dies: Spellbinders ~ Nestabilities: rectangles; inverted circles;
Other:  magnet number; BasicGrey: magnet snaps; 3D foam;

*Skin: E000, E00, 11, 13, Hair: E31, 35, 57, 74, 79, Outfit: B000, 91, 95, 97, BG32, 49, E07, R59, ground: BV20, 23, 25, B60 shadow and a little colourless blender!!!

This sweet and dapper little laddie will be available on Wednesday, September 1st along with rest of our "SWEET SEPTEMBER" Releases! This all leads to our DT Blog Hop on the 1st where there are going to be some PRETTY amazing prizes given away....trust me!

For now, sit back, enjoy the eye candy, and we'll see you back here on MONDAY with another SUPER sweet preview!
 
HuGs Kim :)

Wednesday, August 25

Quixotic Paperie Challenge ~ Shiny Happy People!!!


It's Wednesday and the challenge this week over at Quixotic Paperie has been chosen by the wonderful Kim Dellow

Shiny, Happy People ~ add a glitter, glitter glue, gloss etc... so I did, all over her fabulous boa, around the edges of the coloured image, even her crown got a little glitter. Check out the gorgeous acetate that's part of the Fancy pants kit I have creased and folded the two ends to raise it up so you can see through and also see the glitter. HAD to add a touch of bling too with a yummy prima sequin centre!!!

Supplies: Patterned Paper: fancy pants: roadshow collection kit; Kraft cardstock;
Stamps: Mo Manning for stamping Bella: diva;
Ink: black; copics makers*; Ranger ~ distress inks;
Other: Prima: sequin centres; Viva Decor: glitter liner; Flat Back Acrylic Round Gems - Black; 3D foam;
  
 
*Skin: E000, E00, 11, 13, Hair: E31, 35, 37, 57, 79, Outfit: RV10, R000, E41, E51, 07, R59, YG11, 100, N9, N1, E50, B60 and a little colourless blender!!!


I have followed Card Patterns Sketch #78,
Thanks so much for stopping by, BiG HuGs Kim :)
Monday, August 23

Simon Says Stamp & Show ~ Sweet Lord of... 'Tim Holtz' style!!!

Welcome... it's the start of the week and we're now on our third


and this week... it's all about your Lord of 'Tim Holtz' style...

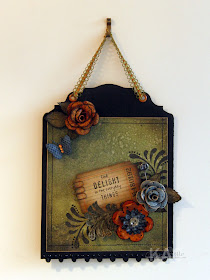
This altered tin came about as I found it so so hard to narrow down to just a few Tim Holtz inspired elements... Although I picked a pretty small item to alter I think I crammed as much as I could on it LOL! I prepared the tin with pitch black paint dabber and (as my crackle paint has dried up) I went ahead and used elmers glue and a blue paint badder for the crackle effect. Tattered florals is one of my go to dies cut with TH vintage shabby papers, inky edges and perfect pearls mini mister mist.. Of course I had to add a couple of tickets and grunge elements inked with distress ink and embossing powder.


For added fun I cut TH heart wings from shrink plastic to make my own magnetic charm which of course menas it stays onto the tin without adhesive. As I might be a little impatient I applied glossy accents on the top before the silver paint had time to dry which resulted in the speckled effect! Then for a little change on the fabulous 'Wendy Vechi' memo pin embellishment, I inked a foliage flower with alcohol ink adhered a stone in the centre and continued to fill memo pin with glossy accents. Which after a couple of days still hasn't dried clear must be the metal with metal too enclosed unlike using paper.

Supplies: Paper: Grunge paper; Tim Holtz: vintage shabby; kraft; Shrink plastic;
Stamps: Tim Holtz: odds and ends 100th Set;
Ink: Archival: black; Ranger ~ Distress inks: distress stickles; Adirondack: paint dabber: aqua; pitch black; silver; Alcohol ink : terracotta;
Dies: Sizzix ~ 3d flower; Tim Holtz: tattered florals; Heart wings;
Other: Felt; TH: memo pins; Accoutrements; Foliage flowers; Glossy accents; perfect pearls: gold; Adhesive stones; Magnetic snaps; Silver embossing powder; distress embossing powder; hemp twine; sweetie tin; 3D foam;

Thank you so much for stopping by I hope you feel inspired and check out the rest of the teams stunning Tim Holtz inspired projects!!!
our awesome co-ordinator... Linda Elbourne ~ http://www.acraftingjourney.blogspot.com
Kim Costello ~ You're already here

Happy HuGs Kim :)

Saturday, August 21

The Greeting Farm ~ Sketch For You To Try...

Today, The Greeting Farm is sponsoring the Sketch for You To Try on the very fabulous Jen Del Muro's Blog. Jen has a weekly sketch challenge on Saturday's, a Star-studded DT, and some awesome monthly guests and when we had the opportunity to sponsor her blog, we jumped at the chance!


Not only are WE giving away our regular random digi prize this week, but please be sure to check out Jen's Blog, "I heart2stamp" as there is a RUBBER prize at stake for a lucky winner over on her side! 

I've created an unusual fold using the sketch as a guideline.
The top picture is it closed, then Anya hidden underneath!


Here's a close up of the Image embossed ~ I used two layers of cereal box card and embossed the image after stamping the outline! Then coloured using copic markers and tinted with distress inks!


Supplies: Patterned Paper: WRMK: vintage blue;
Stamps: The Greeting Farm: flirty Anya;
Ink: Memento: black; Copic: markers*;
Ranger: distress inks: antique linen;
Dies: Spellbinders ~ Nestabilities: circle;
Other: Edge distresser, BasicGrey bling rub on; WRMK: stickers; 3D foam;


*Skin: E000, E00, 11, 13, R20,  Hair: E31, 35, 50, 51, Outfit: V05, RV34, 10, BG11, 13, 45, 49 and a little colourless blender!!!

Thanks you so much for stopping by, Have a wonderful and creative day HuGs Kim :)

BasicGrey Challenges #27 ~ Fabric

We really hope that you can join in with this fortnights Basic Grey challenge, which is...

Fabric...

This week we would love to see some Fabric used on your creations, this can be anything from Fabric brads, to some wonderful Fabric flowers like some of our fab DT have used, the possibilities are endless and the choice is completely up to you, we so cant wait to see what you can come up with...


I've used felt, cotton lace trim, and the ribbon! I thought I would try resist techinque with this gorgeous stamp. I have stamped onto patterned paper but it's not easy to make out with all the ink that I have applied LOL!


I have also followed Kazan's wonderful Sketch #59 over at 2 Sketches 4 You.


Thanks so much for stopping by HuGs Kim :)

Monday, August 16

Simon Says Stamp and Show ~ your Art!!!

Welcome... today sees the second


and this week... it's all about your Studio 490/Wendy Vecchi style

...rusty hinge, forest moss & stormy sky the three colours Wendy currently used for her fabulous ART Here! Armed with these I went straight in and have used direct to paper technique, on some watercolour paper, blended a bit and then generously spritzed all over with my own gold perfect pearls mini mister mist. I've edged around all four sides with gold paint dabber and added a little faux stitching! The base is some chipboard I've die cut the top and bottom, then painted with black paint dabber, added some pearl paint dots to the bottom edge. The trimming I have inked with some of the forest moss distress ink then threaded through thte eyelets!!

Things that have been blatantly taken inspired from Wendy's magnificent style has to be the memo pin embellishment, although I used crackle accents instead of glossy, totally fun!!! And of course it wouldn't be complete without her famously well known grungepaper dimensional roses! So many hand cut elements, I had great fun creating this hanging and wish you could see the sparkly shimmer!


Supplies: Paper: Grunge paper; chip board;
Stamps: Wendy Vecchi: dimensional rose art; TH: Bitty Grunge;
Ink: Archival: black; Ranger ~ Distress inks: Adirondack: paint dabber: gold; pitch black;
Dies: Sizzix ~ Tim Holtz: Ontheedge ~ Plaque and postage; flower layers; Cuttlebug: butterfly;
Other: TH: memo pins; paper clipsAccoutrements; Glossy accents; Crackle Accents; perfect pearls: gold; Adhesive stones; WRMK: eyelets; trimmings; 3D foam;


Supplies I've used are available at Simon Says Stamp Superstore
I really hope you get the chance to join in our challenge, I was soo impressed with the awesome turn out last week WOW you guys ROCK!!! The picture above is totally scrummy prize for this weeks challenge winner and hope you pop over to see the Awesome Design Team and check out their amazing 'Wendy' inspired Art projects!!!


our fearless leader... Linda Elbourne ~ http://www.acraftingjourney.blogspot.com
Kim Costello ~ You're already here
Nancy Crissinger ~ http://whatsnextnancy.blogspot.com
Nancy Wethington ~ http://art-from-the-heart.typepad.com
Terry Wietsma-Girbes ~ http://www.cardscreativity.blogspot.com

Thank you so much for stopping by hope you can join us,
 
BiG HuGs Kim :)

Friday, August 13

Answering your Questions!!! and News!!!


I've had such a fantastic response to my magnets tutorial thank you and I really should have given more info about the supplies I used, I've been very busy lately so here goes....

Supplies: Stamps: The Greeting Farm: Creeper Crew ~ Monday; Tuesday; Wednesday; Thursday; Friday; Jack;
Ink: Memento: black; Copic marker's: various colours;
Dies: Spellbinders nestabilities: squares;
Other: Tim Holtz: Fragments; Glossy accents; Adhesive stones; Viva decor: glitter liner; double sided adhesive sheet; 3D foam sheet; Various magnets;
 
 
hints & tips: you can pop the bubble in the glossy accents with a pin before you leave it to dry! You can use larger images just by cutting them into sections like the above picture! The circle magnets I have adhered with glossy accents. You can buy adhesive magnetic sheet which you can cut to any size, or magnet strip on a roll, the Basic Grey magnetic snaps will work too... there's plenty available from office supplies and craft shops!
 
 
I also had a question about the stand on my Simon Says Stamp and Show birdcage project, there's still plenty of time to enter, I am loving everyone's winged creations!!! ~ anyway, I thought it's easier to show you...
 
Hold your cardstock onto the die with a little masking tape
leave the cut waste in the die you want this to line up your next cut
Lay your card stock over the last cut piece and secure with the tape! then cut.

Hints & tips:  I scored each piece in half first and adhered five together, with the score lines to the centre to form a pointed star... then I cut the decorative edge using the above method! Hope it helps!

 
If you have any questions feel free to ask anytime, even on older projects and I will answer as best I can!
 
 
SALE!!! - Pop over to Quixotic Paperie as Elaine has some special
 
WEEKEND OFFERS 13/08/2010 to 16/08/2010
15% off Basic Grey, Cosmo Cricket, The Girl's Paperie & Prima
10% off Viva Decor Products!


Hope it helps have a fabulously creative day, It's pouring down here!!!
HuGs Kim :)

Wednesday, August 11

Quixotic Challenge #36 ~ Alter It!!!

This is my second post today if you would love to scroll down to view my Club Anya magnet tutorial, Thanks :)

The challenge this week over at Quixotic Paperie has been chosen by the wonderful Rowena...

Alter It! Alter an item, or create a card using for example altered chipboard etc.
I did try altering the background papers with distress crackle paint but mine's dried up and not cracking well! Loving these papers and I have cut a few of the rabbit images out to place behind the filmstrip ribbon. So I've inked edges, added paint dabber under the left panel and the main altering is the witches hat, cut from grungepaper, painted with pitch black and applied a generous amount of clear crackle rock candy! I've also altered the colour of the string with distress inks and sanded the metal corner a little! Finished with a few random viva decor pearl paint drops!

Supplies: Patterned Paper: Graphic 45 Halloween in Wonderland; Grunge paper;
Ink: ~ distress clear crackle paint;
Other:Viva decor ~ pearl paints; Tim Holtz: corners; filmstrip ribbon; paint dabber; mini fasteners; 3D foam;


I'm also entering this in for the wonderful Compendium of Curiosities, Week 9! Which is using distress crackle paint, I've used my clear as my other colour has run dry!

I have followed Mercy's fabulous Tuesday sketch #86,
Thanks so much for stopping by, have a fabulous & creative Day,
BiG HuGs Kim :)

Tutorial of some Magnets...

Whatcha Tootin' About Wednesday?.... How about turning your stamped Anya and Friends into fun Magnets? I have created a couple of tutorials over at Club Anya & Friends to help inspire you and here's a 'weeks' worth of creeper variations too...

ETA: the supply list is here, also added a few tips too!

Glossy accents onto coloured image, with a little gem, adhered to adhesive foam & magnet on back
Don't worry if you run out of large squares, try making a four tiled image...
This is stampboard, copics, glitter & Bling covered with glossy accents.
This is the tile effect with smaller fragments...
a magnet for each corner!!!
Here is the Stampboard and Glossy accents (arrrghhhh to the blurry hair)
How about rectangles? This is Stampboard, copics and UTEE...
The finished 'fragment' magnet from the Tutorial...

Hope it Inspires... have a wonderfully Creative Day
BiG HuGs Kim :)